Monday, 27 April 2020

DraftSight 2020 Automatic Add & Arrange Dimensions

For the past few years DraftSight has introduced a lot of productivity enhancement tools, likewise in 2020 also they introduce automatically add & arrange dimensions. Dimension drawings automatically to save hours of time per drawing, improve consistency and reduce manual tedious tasks.

Steps:

1. Select All Entities > Right-Click > Dimension Bounding Box > Create


2. Type AUTODIMENSION > In the Properties Pane, select the entities for Horizontal Dimension scheme, Vertical Dimension scheme, Dimension Placements and Origin


3. At the bottom of the property pane > Preview and Apply.


4.


 For Auto-Arrange Dimensions, Goto Annotate Tab > Select Auto Arrange, Alias –ARRANGEDIMESIONS > Specify the spacing value in the Dimension Palette and use the Thumbwheel to adjust the spacing of the dimensions.


I believe that the above mentioned steps gives a better understanding of how to use the tool. Moreover, Auto-Arrange dimensions allow the user to save a lot of time while giving them direct control over dimension placement. They increases productivity by reducing a significant amount of time while inserting and adding dimensions to drawing.


       For more info, Visit: www.egsindia.com | www.egs.co.in


Wednesday, 15 April 2020

Design for Manufacturability using SolidWorks Tools

Design & Manufacturing Process Overview

The design stage is considered the most crucial component in the product lifecycle
process - the platform for the conception and development of new products.
Approximately 80 percent or more of the lifecycle costs of a product are determined
during the design stage. Companies are constantly fight the battle and pay the price
of miscommunication between design and manufacturing departments. Finding
errors and fixing defects during the design stage is the optimal way to achieve high
quality and cost-effective products.

Iterative Design Process

In the iterative approach to the design process, the designer needs to receive early
feedback from the manufacturing department to address any manufacturability
concerns before the design is frozen. This methodology is ideal however it is
generally only feasible in an environment where the manufacturing & design
departments are co-located. With the “Design anywhere - Make anywhere” practice
common throughout the world today, implementing iterative design is even more of
a challenge. In addition, because the iterative process involves manual reviews and
can be very time consuming, it is very difficult to catch and fix every concern in
complex part models.

Design for Manufacturability

Design for manufacturability (DFM) is a systematic approach for designers that
provides upstream manufacturability validation and identification of arear of a design
that is difficult, expensive, or impossible to machine by conventional methods.

SolidWorks DFMXpress: What is it?

DFMXpress combines practical process functionality with accuracy and ease of use. It
is perfect for the designer who needs to do manufacturability analysis but is not
necessarily a manufacturing expert and also permits designers to easily gain insight
into the cost-effective manufacturability of their designs by doing things properly the
first time.


Drill Rules

▪ Hole Depth to Diameter Ratio                                                 
▪ Hole Entry and Exit Surfaces
▪ Hole Intersecting Cavities
▪ Minimum % of Hole Area Inside Part

Mill Rules

▪ Fillets on Outside Edges
▪ Sharp Internal Corners
▪ Inaccessible Features
▪ Mill Tool Depth to Diameter Ratio

Turn Rules

▪ Minimum Corner Radius
▪ Minimum % Bore Relief

Sheet Metal

▪ Hole-Diameter-to-Thickness Ratio
▪ Simple Hole Spacing to Thickness Ratio
▪ Recommended Bend Radius

Injection Molding

▪ Minimum Wall Thickness – Maximum Wall
Thickness

Standard Hole Sizes 

▪ Standard Hole Sizes – Non-Standard Hole Sizes


Mold & Cast Part Check Tools:

 
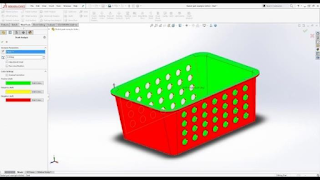
Draft check

Undercut check
                                                                          

▪ You can use Undercut Analysis to find trapped areas in a model that cannot be
ejected from the mold.
▪ Set analysis parameters and color settings to identify and visualize areas with
insufficient draft on molded parts.

Thickness Analysis:

Thickness Analysis is used to identify the various thicknesses at each point on the
model, which helps to identify problematic areas that might be too thin or too thin in
any specific regions. This will be helpful when using thin-walled plastic parts.
Use Thickness Analysis to:
▪ Find out thick and thin regions of a part
▪ Determine portions of a part that are equal in thickness


Other DFM Tools Available in SOLIDWORKS for Part:

Geometry Analysis:

Geometry Analysis identifies model entities in a part that could create a problem in
other applications. These applications include finite element modelling or computer￾aided machining.
Geometry Analysis identifies the following entities:
▪ Sliver faces
▪ Small faces
▪ Short edges
▪ Knife (sharp) edges and vertices
▪ Discontinuous edges and faces
The results can be graphically analyzed with the Geometry Analysis Property
Manager that appears after the analysis is complete.


Other DFM Tools Available in SOLIDWORKS for Assembly:

Interference Detection:

One of the key evaluation tools in an assembly is Interference Detection. This shows
any possible interference between selected components so that we can modify the
parts and prevent issues in manufacturing.


Clearance Verification:

When working in an assembly that requires specific clearances, you can estimate and
verify the gap between selected components using the SOLIDWORKS Clearance
Verification Tool


Hole Alignment:

Ensuring hole alignment between various components in your assembly designs, prior
release to manufacturing, it reduce the product development process and make your
design ready for manufacturing in the first time.


Benefits of Design for Manufacturability Tools in SolidWorks:

• DFM tools help Engineers and Designers design less costly and better quality
products, faster
• Helps catch and fix problems related to manufacturability early in the design,
where it is much cheaper and faster to implement corrective action
• DFM tools dramatically improve communication between design and
manufacturing
• DFM Tools help capture design and manufacturing best practices and allow both
designers and manufacturers to become better at their jobs.

Conclusion:

Design flaws are often “easy to identify” but “difficult to solve” during 
downstream stages like manufacturing via simple rules-based checks, DFM allows
designers to optimize the entire design through manufacturing process by predicting
manufacturing issues during the design stage. In addition to saving countless back
and forth design review steps, DFM assists in creating a product design that is
compatible with the desired manufacturing process, in accordance with desired quality
standards, and cost-effective to manufacture.
Stay safe and productive everyone!

For more info, Visit: www.egsindia.com | www.egs.co.in


Friday, 3 April 2020

What is Pores Medium & How to Simulate it in SOLIDWORKS Flow Simulation?

Material which contain Pores are called Porous material, the weight of the porous material is less when compared to the solid material. The porosity of the material is defined by the Porous size the is formed in the material, there are different techniques for manufacturing these type of material depending on the size of the porous void that to be formed.
There are wide range of applications like catalysis, chemical separations, tissue engineering and exhaust manifold. In the exhaust manifold the harm full chemicals are removed by using porous material.
There are different types of Porous material according to direction of flow

1. Isotropic
2. Non Isotropic(Unidirectional, Axisymmetric, Orthotropic)
There will be change in the pressure, velocity and direction of flow changes according to the porous medium, by using Solidworks flow simulation can simulate the flow.

Steps for creating the Porous medium in Flow study:


1. Create the wizard by defining the Flow type, units, types of Fluid.

2. If the porous is not showing in the tree then Right click on project(1) options appear as shown in the Fig:1, click customize tree

3. The options appear as shown in Fig:2, click on the Porous Medium to get activated.


Fig 1
Fig 2
  

4. An exhaust manifold with porous medium and the inlet and out let manifolds as shown below:


5. Defining the porous material to individual domains, one part as unidirectional are shown below:


6. Defining  isotropic for the other domain as shown below:


7. The Fig:3 shows how the porous medium is defined in the study 

Fig 3


By running the simulation we can obtain the inlet and outlet velocity, pressure drop, due to porous medium, depending on the size of the porous and the type of the porous there will be change in the velocity, pressure
drop, these can be captured prier using SolidWorks Flow simulation.


Saturday, 28 March 2020

How to Work from home on your Design using SolidWorks?


          There are many situations and probabilities where we are finding it necessary to work from Home on our design to complete our task, which distinct Possibility becomes for most of us each day.

          Since many countries are in lockdown in an effort to control the spread of pandemic Corona Virus COVID-19, many people all around the world are supposed to work from home to undergo their Design and Development. We as EGS and SolidWorks community, ensure our customers wanted to continue their work productively and efficiently using SolidWorks irrespective of the workplace.

          There are a variety of toolsets in SolidWorks which help us to work, though we are out of Office. Let's begin,

SolidWorks Licensing:

Solidworks License plays an important role in work on software. Solidworks has 2 types of licensing,
  1. SolidWorks Standalone license
  2. SolidWorks Network License

SolidWorks Standalone License:

          In SolidWorks standalone licensing type the license will be installed and activated in a static machine, probably which would be an office Desktop (Primary Machine). In the event of Work From Home (WFH), the user needs the license to be activated in the home PC (Secondary Machine) or in his Laptop to get an uninterrupted work. Now let's see how this license can be transferred from the Primary Machine to Secondary Machine.

Step1: (In the license activated machine) Go to Help ---> Deactivate License

The license will be deactivated from the Primary machine.

Step2: Then go to the secondary machine on which the license to be activated.

Step3: Once after installation of SolidWorks on the Home pc, open SolidWorks, it prompts you to activate the license.

Step4: Following the wizard will activate the license in the home PC. (Internet connection is needed to activate the license).

Now the user can work SolidWorks from Home using his secondary machine.

SolidWorks Network License SNL:

There are 2 ways to access the SNL from the Primary machine to Secondary machine.

          First, we can borrow a license from one machine to another machine for 30 days. The computer needs to be connected to the network temporarily until the license is borrowed and can then be disconnected and used remotely for a period of 30 days. The license can be sent back to the server once the time period is up.

          Secondly, we can access the Network license manager from the Primary machine to the Secondary machine through a VPN. We recommend you use the first method (Borrowing license) rather than connecting through VPN because the VPN setup should maintain constant MAC address or else license will get hung up if we disconnect and reconnect the VPN.

Access SolidWorks Data and other Data from Remote location using SolidWorks PDM:


          SolidWorks PDM Professional will help the users to access the Data from the remote location based on the Roles and Responsibilities provided by the Administrator. We need VPN access to your company's server to get this done. It includes the functionality to keep everyone connected, collaborated and communicated on the same data sets without overwriting the content.

          SolidWorks PDM Professional also has the WEB 2 interface to get connected from the outside sources. The SOLIDWORKS PDM Professional WEB 2 interface allows PC and mobile devices to access the SOLIDWORKS PDM vault. By providing the User Credentials, the user can only access the items which would relevant to them. We can also track their access using Powerful History and log files. We can entirely automate our process through SolidWorksPDM Professional.

To get more relevant information about SolidWorks PDM, kindly click the below link and explore https://www.egsindia.com/enterprise -PDM-implementation-services.php

SolidWorks eDrawing:

          SolidWorks eDrawing is a communication tool for the stakeholders in the Design to Manufacture process as well as for the external prospects and the customers.

          CAD and non-CAD users can share their 3D models with mark-ups to their counterparts, customers, and Vendors to accelerate their design process. It also helps you to create review enabled eDrawing files that allow an unlimited number of recipients to mark -up and provide feedback on Product Design.

The New 3D Experience Platform:

          SolidWorks have now introduced a new platform called 3D Experience platform which has a set of tools to enable collaboration across disconnected design teams and there are multiple applications available that can help with this.

          With a single easy to use interface, it provides Industry Solution Experiences – based on 3D design, analysis, simulation, and intelligence software in a collaborative, interactive environment. It is available on-premise and on the cloud.

          It has multiple Apps available on the platform to improve the Design and Development process, based on the Roles like Business Innovator, Industry Innovator, 3D creator, 3D Sculptor, Project Planner, etc.

          3D Creator is a browser-based 3D modelling solution that enables designers and engineers to create, review and evaluate 3D models through easy-to-use parametric modelling capabilities that are built on the cloud-based 3DEXPERIENCE platform.

          3D Creator complements SOLIDWORKS 3D CAD with flexible design workflows and a seamless interchange of design data.

          Collaborative Business Innovator provides the applications and services to digitally connect employees, suppliers, customers, and consumers. It enables the teams to create dashboards and communities, aggregate and share data, and connect people and data in one place to empower collaboration, agility, and faster time to market.

          Industry Innovator enables the user to securely store, organize and manage the content and collaborate in real-time. It also connects the entire cross-functional team in the online environment. It stores your entire product IP including multi-CAD design data into one place.

          The 3DEXPERIENCE Platform includes a useful set of browser-based design tools like xDesign, a full 3D Modelling application, xShape, a freeform surface modeller and there is even advanced simulation tools and much more.

To explore more on this tool kindly click the below link, 

This concludes our blog on Work from home on your Design using SolidWorks. 
Contact us:  info@egs.co.in

"Stay Safe, Stay Home" for a COVID-19 Virus-free world. - Team EGS India

For more info, Visit: www.egsindia.com | www.egs.co.in

Wednesday, 11 September 2019

DraftSight 2019 – New and Improved Features for 2D CAD Users

          DraftSight 2019 (Professional and Enterprise Editions) has had exciting new features and improvements that would be useful to the 2D CAD users who create Drawings (DWG) files compatible with AutoCAD.

New Features in DraftSight 2019
ü Using _VECTORIZE_IMAGE Command, a user can convert raster image in BMP, JPEG, PNG format into vectorized line entities.  This Image Tracing ability improves productivity for Raster to Vector Conversion requirements.
This is ideally suited for architectural floor plans, logos and simple images using curves.
üGenerate 2D Floor plan Drawings from 3D Data sets created in HomeByMe web-based design application (.DSHBM File format) used for home and space planning, using DSHOMEBYME Command.
üIMPORTSVG enables a user to import SVG format files into DraftSight and insert it as a block.
üPre-defined Frames and Title Blocks are provided, according to Engineering Standard and can be used using the TB_FRAME command by the user specifying the size and scale.
üBLOCKATTRIBUTEMANAGER enables the user to Manage Block Attribute Properties and settings in Block Definitions.
üTable Cells can now use formulae with arithmetic operators along with Count, Sum and Average functions (establishing a relationship with values from other cells).
üTrim and PowerTrim commands can now be used to trim Hatches and Gradients including associativity while using the Divide option.
üMoving entities by click and drag with the mouse are now easy and simple.
üLaser Cutter output can have line-width control using the hairline option for printout


New Improvements in DraftSight 2019
üCENTERMARK command improves the display of center marks according to standards
üViewport Layer Freezing, freezes specified layers in new viewports on layout sheets or freezes selected layers only in the current layout viewport
üHigh resolution (4K) Display friendly SVG scalable icons for User interface
ü3D Mouse support for 2D and 3D Drawings in DraftSight environment – very high productivity for users with simultaneous pan and zoom (for drawings) and rotate for models.
üImport and Attach tools unified in a new ribbon tab for ease of use

Enhances in DraftSight 2019 API
üEnhancements include
üGet toolbar ID
üInsert and modify curved text
üAccess and modify custom entity
üEnhancements to existing options for exporting drawing models or sheets to PDF files.

For more information on DraftSight, Visit: www.egs.co.in/DraftSight.html

Saturday, 31 August 2019

Automated Technical Data Management

          Using Paperless automation easy access to documents from anywhere in the world which will keep you to track on with proper business operations. seamless communication between employees is always in the updated data.
Impacts :
  • Workflow automation not only streamlines your business processes but also helps you to cutoff costs.
  • Manual documentation will be a time-consuming process. Time is money! Just imagine how much time you could save and use it elsewhere in productively- if documents were located quickly.
  • Manual data entry is usually plagued with human errors that cost time and money. Workflow automation solutions help you to eliminate human errors, thus boosting your business process.
  • With automated technical data management is in use, you can track what tasks have been completed, by who and when. Records are kept throughout the process. Legacy data plays a huge role in your business.
  • Documents can easily be shared among colleagues and accessed from multiple locations. Work doesn’t have to be limited to office environments.
  • Streamlined automation integrates with the project management system enables you to assign work and easily monitor the overall progress.
Final word
          Automation is no longer the future of business, but the way to go for today’s business should immediately adopt workflow automation solutions. But one thing is clear; using a manual system in a digital world is a race to the bottom.


Friday, 23 August 2019

How to Get Realistic Output in Less Time - SOLIDWORKS Visualize

The fastest and easiest way to create Realistic Photo Content with time-saving features.

          To improve concepts that are viewed throughout the design, development and marketing phases. SOLIDWORKS visualize helps the user to select, validate, improve and sell the best and most robust design concept before committing expensive engineering, prototyping, and marketing re-source to the projects. It helps to reduce errors and ensures product get to the market faster, improving engineering design and sales review, helps to make more educated final decision which in turns drastically reduce cost and reduce the number of physical prototype that helps to achieve much more efficiently delivering the rendered content to marketing to promote new products via online or as a presentation content which allows added time saving for more design results in overall better final product.

  • Without SOLIDWORKS Visualize the resultant will be like manufacturing the user end product which consumes series of time in its process.
  • With SOLIDWORKS Visualize you can streamline this series of the process into a parallel process which reduces the time by forty percentage.
Hybrid Render Mode

SOLIDWORKS Visualize can make use of both GPU and CPU are simultaneously known as a hybrid mode in a single machine, which dramatically improves the performance of rendering time. Which allows a budget-friendly workstation to generate content in a faster manner.


Intuitive User Interface

Easy Mode Interface - An Simplified User Interface with five-button which allows non CAD users in less time to create the photo content.

Cad Live-Update

Now we can re-import models in our project, allows us to reduce the time taken for rework which makes the user change the parts that have already change in the 3D cad model

Artificial Intelligence Denoiser

With AI Denoiser we can improve the rendering time by ten times allows us to create the photorealistic content, interactive animation, and 360-degree spins, The output of 500 passes can be achieved by only using 50passes which is time effective.