Posts

Check the Product Manufacturability at the Design Stage

Image
DFM  stands for  Design for Manufacturing . The good Design practice is not only focusing on the Product design alone, but also its producibility or manufacturability. It is most important to detect and eliminate mistakes before the product or part goes to manufacturing. SOLIDWORKS  has an inbuilt DFM tool called  DFMXpress  that helps in implementing common manufacturability checks related to machining and sheet metal fabrication. It helps to avoid downstream problems early in the design stage, thereby reduces cost and minimizes time to market. DFMXpress reduces engineering changes (ECNs & ECOs) by predicting manufacturing problems early in the upstream design stage. It ensures that the design is compatible with available or desired manufacturing process and can be manufactured economically. This allows potential problem to be fixed in the design stage which is the least expensive place to address them. The design of the component can have eno...

SOLIDWORKS Solutions for Piping Design

Image
SOLIDWORKS Routing Solutions give ample set of tools for creation of Pipe, Tube and Electrical route Designs. Piping Industry deals with complex routing lines, that are difficult to be predicted and Serviced. Design of these Piping Systems is also a tedious job, for the design engineer.  SOLIDWORKS Automates the Way of Piping Design with solutions like Auto-Routing Capabilities and Dedicated Routing Library with Reusable Components like Flanges, Fittings, Equipments and Pipes of Different standards. Piping Solutions from Solidworks: Easy to Create 3D piping system designs, just by a 3d sketch Auto-route capability & Designs can be easily edited according to assembly and service needs Automatically generate piping manufacturing drawings from 3D models Different Connections like butt welded, socket welded, threaded, and other connections are  available Calculate cut lengths for all pipe and tube runs Automate placement of supports and hange...

Direct Model Editing through SOLIDWORKS

Image
About SOLIDWORKS 3D CAD software gives designers simple ways to quickly create and adjust 3D model geometry using direct model editing. Simply click on the model geometry and move it, speeding up design, saving time and development costs, and increasing productivity. Direct Model Editing Overview Easy-to-use direct model editing enables designers to quickly make changes to their 3D model: Direct Edit Toolbar enables you to copy, move, split, replace, offset, push, and drag geometry to create the result you want. Patterns instantly create SOLIDWORKS features, faces, and solid bodies with a simple click made directly on the geometry to be patterned. Direct Edit capabilities automatically convert non-native, imported model geometry into intelligent SOLIDWORKS features that can be modified parametrically or through direct geometry manipulation. Instant3D capabilities let you drag geometry and dimension manipulators to create and modify features. Live Section capabilities c...

SOLIDWORKS 2016 SP 2.0

Image
MAKE GREAT DESIGN HAPPEN SOLIDWORKS has launched a new Service pack update of SOLIDWORKS 2016. Check out, the all new SOLIDWORKS 2016 SP 2.0 Visit the link below to explore the SP 2.0 release document. http://files.solidworks.com/Supportfiles/Release_Notes/2016/English/relnotes.htm Contact us for more info on what’s New in SOLIDWORKS 2016: http://www.egsindia.com/solidworks-2016/index.html

Understanding the Role Of Assembly Visualization

Image
Assembly Visualization Assembly Visualization provides different ways to display and sort an assembly's components in a list and in the graphics area. If you want a more detailed look at the rebuild time of individual components, Assembly Visualization found under the  Evaluate  tab is the way to go. This tool allows you to look at your assembly in many different ways. It helps to sort the list by one property at a time or create more complex sorting scenarios involving several different properties. Basic calculated numerical data such as component mass, density, and volume are available in the tool. Additionally, customized criteria can also be created which are dependent on several numerical values. In some cases it is necessary to define non calculated properties such as Vendor or Status in the component files, those properties can also be accessed for modification and sorting. Properties from SOLIDWORKS Sustainability are also available. In the ...

Detecting Overridden Dimension

Image
SOLIDWORKS Design Checker SolidWorks Design Checker verifies design elements such as  Dimensioning Standards  Fonts, Materials  Sketches  to ensure that SOLIDWORKS documents meet pre-defined design criteria Adding SolidWorks Design Checker to SOLIDWORKS Click Tools > Add-ins. Select SolidWorks Design Checker , then click OK. Click Tools > Design Checker. Click Create a “New Standards File”  Select Overridden Dimension Save File as a “Standards file“ (*.swstd format) To Check active document Click Tools > Check Active Document Add The (*.swstd) file to check Select Check document   All the “Overridden Dimension are highlighted dynamically Perform the desired operation

Bevel Gear Mechanism

Image

PRODUCE DEFECT FREE PLASTIC PARTS

Image
Introduction SOLIDWORKS Plastics is used for both part designers and mold designers. In this blog, you can get information on how this technology can help in creating and optimizing parts, single and multi cavity and family mold layouts. SOLIDWORKS Plastics SOLIDWORKS Plastics most useful for Injection Molding setup organization. Validate and visualize the melted Plastic Flow on the parts and molds. Improvise the part quality by predicting manufacturing defects in the initial stages of the design. Have alternate polymer material selection during the design phase using plastic simulation Create variations among your plastic designs and test virtually before the manufacturing stage. Steps involved in testing your Plastic Parts: Draft Analysis Meshing Applying Polymer (Material) Gate Location Run the Analysis Results Report Generation SOLIDWORKS Plastics contains vast material a...

Ease your Material Handling Design with SOLIDWORKS

Image
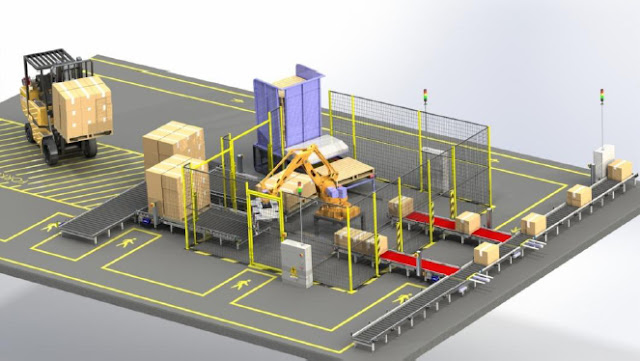
Challenges faced in Design of Material Handling Systems Visualising Complex Designs Increased design cycle time Product quality and performance Design reuse and configurable Designs Increased Material costs & warranty costs How to address these challenges Transition from 2D to 3D and visualizing large assembly designs Reduce design cycle by Automating Design Process Improve product quality and performance by identifying hotspots Modular Design and Design interference Checks Weight reduction and load carrying capacity determination Ensure reliability and safety as per standards SOLIDWORKS Solutions in Action  Solidworks Solutions boosts innovation to make Companies more profitable and more productive. Solidworks Simulation stands aside Design Team to Virtually test at early stages of design process Design Automation Tools like Driveworksxpress and Solidworks API improves performance and captures knowledge to be used continually. Design opti...

Leveraging Engineering Data across your entire Company

Image

Create Sheet Metal Swept Flanges "Hole" in a better Way

Image
One of the best sheet metal enhancements in SOLIDWORKS 2016 is the ability to add Cut Features to a Swept Flange and have those features map correctly to the Flat Pattern. Although the Swept Flange tool is a wonderful part of the Sheet Metal toolset, I have had many users comment about how frustrated they were that they could add Cut and Hole Features to their Swept Flanges and see them in their formed views but the hole features were missing in their Flat Pattern when it was time to send the part out to the Punch Press or Laser Cutter! SOLIDWORKS 2015 Sheet Metal Swept Flange Flat Pattern Above is a Sheet Metal part created in SOLIDWORKS 2015, the part is made using a Swept Flange and two Cut features. You can see when the part is flattened the two Cut Features do not propagate to the Flat Pattern and disappear from the view, this would usually result in having to add the Cut Features to the Flat Pattern separately which results in a potential loss in accuracy and adding valu...

Watch Out a New Tool in SOLIDWORKS 2016

Image
To ensure greater accuracy for digital simulation or to produce a 3D printed prototype, it’s often necessary to model the physical threads on shafts and holes, among many other features. To create a thread in previous versions of SOLIDWORKS, we had to manually create a profile and a helix for creating a swept cut. This process has now been automated with a new Thread tool in SOLIDWORKS 2016 . The new Thread tool allow us to create helical threads on cylindrical faces using profile sketches. Now, this feature is very flexible, allowing us to specify the start thread location, an offset, end conditions, the type, size, diameter, pitch and rotation angle, and even choose options like right-hand or left-hand thread. We can also create our own custom thread profiles like weldment profile. SOLIDWORKS allow us to store our custom thread profile as a library feature. The default location where these are saved can be modified at Tools > Options > System Options > File Locations . ...

Geneva Mechanism

Image