How to Link SOLIDWORKS Custom Properties in a Drawing Template?
SOLIDWORKS Custom Properties Linking in Drawing Template
Open new drawing document Click New (Standard toolbar) or File > New. In the dialog box, select “Drawing” or your standard custom drawing document.
Editing drawing sheet format by clicking the sheet format tab on command manager tabs then click edit sheet format icon.

You can edit the size of the title block boxes and If needs to insert company logo you can insert then if the text boxes were needs, click Title Block Field.
There you can add the multiple text boxes for the values, text or custom properties of the files been added.
When you are in sheet format editing window you can see the $PRPSHEET followed by the attributes been enter or link to the custom properties as shown below.

There you can add the multiple text boxes for the values, text or custom properties of the files been added.
When you are in sheet format editing window you can see the $PRPSHEET followed by the attributes been enter or link to the custom properties as shown below.
If the $PRPSHEET is used to link the custom properties of the part or assembly file once the model were inserted here.
When the $PRPRSHEET is not available in some of the fields then we need to add the text boxes and then you can fill them manually or link to the custom properties of the part file or assembly file.
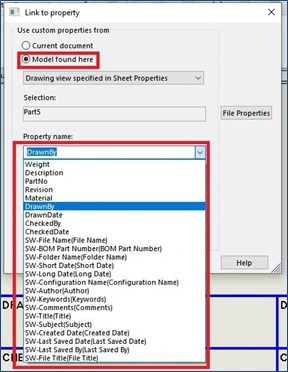
By clicking the Text box fields it shows the options in Property manager by clicking the link to property under the text format it opens the Link to property window.

In Link to Property window select the Model found here radio button and select the desired property under the Property name drop down list and click OK.
Below image shows that text boxes were linked to the custom properties and updated to the drawing files sheet.

Save this drawing file as drawing document template by click File> Save as>Drawing Template(*.drwdot) from the save as type and click save.

Here, The drawing document template has saved and mapped the document template on file location in SOLIDWORKS Options.
Contact Us: Have questions or need assistance? Feel free to reach out!!
Email: mktg@egs.co.in
Phone: +91 94454 24704


Comments
Post a Comment