Wednesday, 13 September 2017

SOLIDWORKS Design Checker

SOLIDWORKS Design Checker verifies design elements such as dimensioning standards, fonts, materials, and sketches to ensure that SOLIDWORKS documents meet company standards.

With SOLIDWORKS Design Checker you can: 

  • Verify designs against company standards  
  • Automatically correct nonconforming design and drafting issues
  • Build Checks—Set up and save specific design and drafting checks
  • Check specifically for fonts, dimensions, arrows, units, and other documentation details
  • Compare your drawing to past results from reviews of other drawings

Options available to check: 


Check Active Document—Run the check to validate your document (drawing or model) against the requirement
Check against Existing File—Validate the active document against design checks created from existing files
Learn Checks Wizard—Retrieve design checks based on attributes from an existing SOLIDWORKS part, assembly, or drawing document

To enable Design Checker in SOLIDWORKS Interface:

1. Click Tools > Add-Ins.
2. Select SOLIDWORKS Design Checker, and then click OK.

Checking drawing sheet

To Check the Drawing Sheet using Design Checker
Click TOOLS > Design Checker > Check Active Document


In this example, Design Checker runs the check and Displays the correction in the active drawing sheet with respect to ISO Standard.


Design Checker lists the failed checks in order of the criticality assigned to each check. Expand each individual entry to list the Parameter Name, Actual Value, and Preferred Value(s)

Use Auto Correct All or Correct Selected to correct failed checks


  • Click Correct Selected to correct only the selected failed checks from the tree, or click Auto Correct All, to correct all failed checks for which Design Checker supports auto-correction.
  • The failed checks are corrected with the values set in each of the preferred auto correction values box.


Likewise you can check against the existing file, Document checks, Annotation checks, Dimension checks, Part document checks and Assembly document checks.

Benefits:


  1. Design Checker can analyze and correct the problems automatically
  2. The Check wizard can be saved as a report to be shared with others and the report is in HTML doc with colour coded to easily identify the past and present results.
  3. It eliminates the manual errors and allows you to ensure the design is complete before releasing.


Friday, 8 September 2017

Stack up Analysis

SOLIDWORKS Stack up Analysis is a mathematical calculation used to measure a gap and
interference value between parts in an Assembly due to variation in its form, orientation and location.
Stack up Analysis is an analytical reasoning tool used to decide the allowable value of interference or
gap between parts from the key perspectives of its functional requirements in an assembly and its
manufacturability.

Why stack up is necessary

  • To ensure all the part fits together in assembly
  • To measure the Allowable value in form due to the variants in manufacturing
  • To understand the worst case of the fit and form of all parts in an assembly
  • For manufacturing the parts by assuring the allowable variation in size and location


SOLIDWORKS tolerance stack up analysis provides solution for finding the minimum and maximum
deviation and root sum squared (RSS) tolerance analysis.

Benefits:

  • Well understanding of the functional requirement of the each part in an assembly
  • Prevention of quality defects and improved product quality at its design stage
  • Cost reduction due to the optimized tolerance
  • Improved customer satisfaction
  • Reduction in time to market


Thursday, 7 September 2017

Comparison of SolidWorks Simulation with Mathematical Calculation

Mathematical Calculation

The below shown in figure 1 which formed by two different materials AISI 1020 and Alloy Steel. The component is fixed at one end and in other side axial load is applied.

Figure 1

The compound beam as two elements and three nodes as shown in figure 2

Figure 2


SolidWorks Simulation

Simulation Procedure

  • Cad Geometry
  • Type of Analysis
  • Type of Materials
  • Fixtures
  • Loads
  • Meshing
  • Results

Cad Geometry


Study Results

Stress Results


Displacement Results


Wednesday, 6 September 2017

Flat pattern Drawing views for Multibody Sheetmetal parts

Introduction

Solidworks Multibody Sheet metal parts design allows to create multiple sheet metal
bodies,of potentially different materials,within the same part file. Multibody sheet metal parts can
consist of multiple sheet metal bodies or a combination of sheet metal and other bodies such as
weldment bodies.

Creating Flat pattern Drawing Views for Multiple Sheet Metal Bodies


Drawing views can display entire sheet metal or individual sheet metal multibody parts.
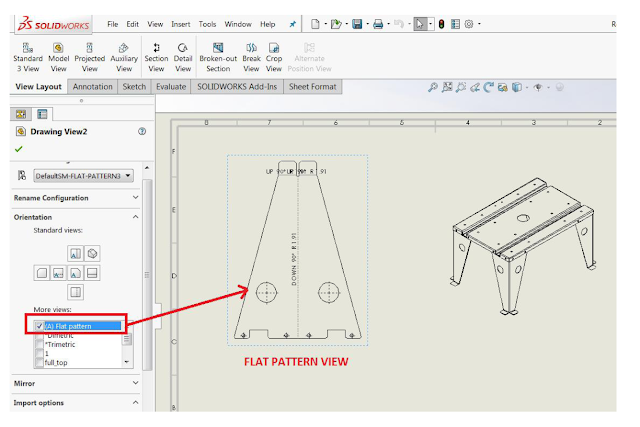
In drawings Model view>Select bodies allows to create Flat pattern drawing view for individual
Sheetmetal parts.
1.Click Model view, Browse the Sheet metal part file & Click Select Bodies


2.Select the individual Sheetmetal body graphically.


3.Click (A) Flat pattern,Click to place on the drawing and Click OK.


Monday, 14 August 2017

SOLIDWORKS 3D Interconnect

3D Interconnect in SOLIDWORKS 2017 delivers groundbreaking new capabilities for
working with both neutral and native CAD data from various sources, unlocking powerful new work
flows for us to collaborate with customers and vendors.

By using SOLIDWORKS 3D Interconnect, we can now

  • Maintain direct integration of native CAD files and we can Insert proprietary CAD data directly into a SOLIDWORKS assembly without converting it to a SOLIDWORKS file.
  • Avoid fixing errors or problems due to SOLIDWORKS awareness of all components in the native CAD files, like face and edge Ids.
  • Directly open imported files and treat them like Base Parts, so we can freely make design modifications without affecting the native file.
  • Open the proprietary 3D CAD format in the SOLIDWORKS software with its associative link to the original part.
  • Update changes in the SOLIDWORKS file if we update the proprietary CAD data in its authoring application by maintaining all downstream features created in SOLIDWORKS.
  • Update both part and assembly files as design changes take place with Update Model feature.
  • At any time, we can break the link to the Original CAD file
Supported Format and their versions in 3D Interconnect :


Turning 3D Interconnect On or Off :


Benefits :
  • It enables users to work with data from other CAD systems.
  • It facilitates collaboration between consultants, manufacturers and clients, encouraging a “mixed CAD” environment.
  • Companies who use a combination of software or switch from another 3D CAD system to SOLIDWORKS will greatly benefit from this capability.
  • Now we can freely make design modifications without ever affecting the native file.
  • SOLIDWORKS notifies users when changes are made, ensuring better connectivity throughout your design process.
  • It helps engineers to focus on their design rather than translating files.


Thursday, 3 August 2017

Creating Sketch Offsets on 3D Geometry Surfaces

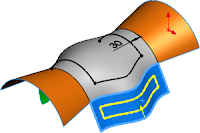
You can use the Offset on Surface tool to offset 3D model edges as well as faces in a 3D sketch. Selecting a single edge will offset that edge. Multiple edge selections will offset the complete chain. You can adjust the offset using the dialogue box or just enter a value. At surface intersections, we can even flip the offset curve to the other side gives you a great flexibility in design. 

We need to reduce some weight of this part and to simplify the complex surface, so let’s see how SOLIDWORKS 2017 can help us. It is now possible to offset curves on any surface. Previously, you had to create extra features for offsetting an edge. 

To create sketch offsets on 3D geometry surfaces:

 1. Open the part model. 
2. Click Offset on Surface(Sketch toolbar) or Tools > Sketch Tools > Offset on Surface.

3. In the graphics area, select the edge as shown.


4. In the Property Manager:

        a) Specify the value of Offset Distance. 
        b) Select Reverse.

            The entity is projected on the opposite face. 

Note: 
       You can only use Reverse when the selected edge is connected to faces that belong to the same body.

5. Select the interior edges as shown. 
6. Click ok.

7. Double-click the dimension and specify value of offset.

If you select a whole surface then SOLIDWORKS offsets all outer edges [Very powerful]. You can use this 3D sketch as a trim tool to cut out the centre of the surface for optimization/ material reduction of the part. 

8. Click Offset on Surface. 

9. In the Property Manager: 
       a) Click face of Surface in the graphics area.  
       b) Specify the value of Offset Distance.
       c) Click ok. 

10. All the edges of surface are offseted now. 

So a powerful new features in SOLIDWORKS 2017 that helps the user to overcome the barriers to create a great looking products. 


Benefits: 
  1. Quick wrapping of entities on surface. 
  2. Easy creation of offset entities as 3D sketch from our existing surface. 
  3. Offseted entities were used for development through fill tool. 
  4. Very useful in material saving and mass reduction.